Legacy Data Syncing of Jira records inside Salesforce
- Category : General
- Article Number : 22
- Publish Date: 24 Jun, 2024
Objective
The objective of this document is to provide instructions on how to update Jira Issue’s legacy data in scenarios where either field was not mapped earlier or reporting was not enabled during the initial project field mapping but it needs to be handled at a later stage.
Solution
(A) Enable Reporting
Step1. Login to your Salesforce Instance.
Step2. Go to the App launcher and enter “Sinergify” in the search box. Select the “Admin Settings” tab in the navigation bar.
Step3. Go to the Field Configuration tab for your specific Jira Instance and ensure the fields are mapped.
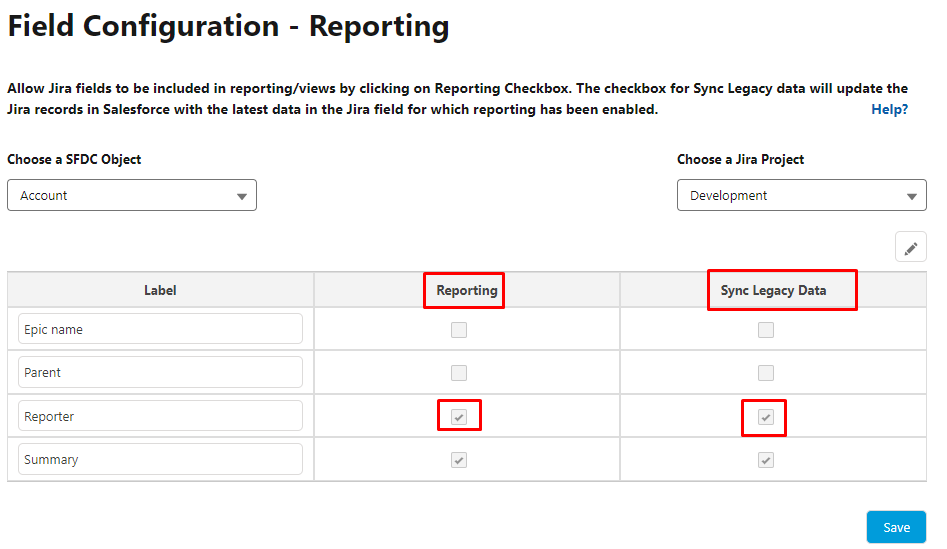
Step4. Go to the Reporting tab, Enable the field in the “Reporting” and “Sync Legacy Data” checkboxes on the reporting mapping screen. Once you enable the sync legacy it will notify you about the batch which needs to be scheduled manually. Please refer to step 1 of “Sync Legacy Data” below.
Step4. Once Reporting is enabled, the respective fields will be created under the “JiraIssue” Object.
Step5. Manually assign the Field-Level Security (FLS) for the respective reporting field(s) according to the business requirements.
(B) Sync Legacy Data
Step1. Schedule the execution of Batch "BatchToAutoUpdateJira" in Salesforce.
-
The batch will fetch 50,000 Jira Issue records at max from the JiraIssue Object. If in case there are more records please reach out for assistance to Sinergify Support.
-
The batch will look for the legacy Jira Issue records and update the latest changes from the actual Jira to the linked Jira Issue record(s) on the “JiraIssue” Object in Salesforce.
Step2. The batch can either update all Jira Issue records or specific Jira issues based on conditions.
-
To update all Jira Issue records, execute the following snippet in the anonymous window:
Grz_Sf.BatchtoAutoUpdateJira batchJob = new Grz_Sf.BatchtoAutoUpdateJira();
Database.executeBatch(batchJob,100);-
To update specific Jira Issue records, follow the below steps:
-
Go to Setup and search for "Custom Settings" in the search input box, then select the same.
-
Select the "JiraSalesforceDetail" Custom Setting and click on Manage.
-
Click the "New" button.
-
Enter the following information in the below-mentioned fields
|
S.No |
Fields |
Value |
|---|---|---|
|
1. |
Name |
JiraLegacy_Filter |
|
2. |
InstanceNumber |
101** |
|
3. |
Value |
SOQL Query(WHERE Name = ‘PS-1’)*** |
** Any number which is not an actual Instance Number. You can use 101.
*** Any Standard WHERE clause can be used to filter the records.
-
Add “JiraLegacy_Filter” in the Name field.
-
Click the "Save" button.
-
Open the Developer Console.
-
Execute the following snippet in the anonymous window:

|
NOTE: The Batch size may vary depending on the actual records which need to be processed. Hence, the above images are for reference purposes. Suggested Batch size: 100 or Less. |
|---|
